Friday, October 16, 2020

Wiring diagram VE Valiant 6 cylinder Auto Wagon (not regal)

Bet you thought I had died. Haven't done a lot with the old girl for ages, and she won't run on petrol, which is a bit of problem since I moved to Queensland two and a half years back. LPG isn't that common north of central NSW, so I dropped the Val off at a local carburettor specialist. He called me about three hours later and said he won't touch my carburettor because the wiring was generally untidy and he was certain that I would blame him if anything ever failed on the wiring (which had nothing to do with the carburettor). Okay took public transport back there again. Three hours spent travelling but I didn't spend the $545 he quoted for the job he was supposed to do.

Determined to tidy the electrics myself and unemployed as a result of the pandemic, I drove home happily in the knowledge that I'd fix her up myself, then rebuild the carburettor myself.

The first issue was that the circuit diagram in the manual was not what you would call easy to follow. Observe below.


So if you have a wire that goes along the full length of the page, or worse, diagonally, following it is a nightmare. I spent about eight hours re-drawing the page using Inkscape.

The result is the same as above except that the wires aren't just labelled, they're coloured too. It makes a remarkable difference in my ability to follow a wire. It's a vector diagram, so you can make it any size you want without any loss of detail. Print on A3 if you want the detail. 

Here is the file. It's in SVG format, and you can view it with just about any vector image software or do that plus edit it with Inkscape.

Sunday, November 8, 2015

Leaky sump (oil pan). How to remove it without removing the engine

This is the other job: I stuffed up putting this gasket on properly when rebuilding the engine about four or five years ago (I'm a bad parent).
I hate tying all the crap out of the way, disconnecting the transmission and all the heartache associated with the inevitable screwing something else up in the very long, laborious process.
So, how does one replace the sump gasket without removing the engine?
Not that easy: You will need a black and tackle or engine lifter.

0. Drain the oil and remove the filter.
1. Remove the bonnet.
2. Drain the radiator and remove both top and bottom hoses.
3. Remove anything else that will stretch, break or get in the way if you raise the engine about six inches. I removed the distributor cap and rotor (so they don't get in the way or broken), air cleaner, coil wires, sender wires (oil and temperature).
4. Remove the idler arm from the car body end and a tie rod end (remove the ball joint, don't unscrew the other end so the steering arm can be swung out of the way.
5. Jack up the car so you can get underneath, and put axle stands under, remove jack.
6. Remove the nut at the bottom of the engine mounting on the driver side and the whole engine mounting on the passenger side. Also remove the transmission splash plate.
7. Attach rope to engine, then lift it with your lifter.
8. Remove bolts from the sump, swing the steering arm out of the way and remove it.

Ta-da! That's the hard bit. Clean the sump and put the new gaskets on. Mine were really bad at staying on, even with some gasket stuff (which isn't required for sealing, purely to stop the cork ones from moving). I had to put the cork ones on after the sump was in place under the engine. Just be careful. Try not to knock the rubber ones: The long rubber dimples are very good at holding it in place but I still managed to knock two of these out at the back.

Putting it back in requires a bit of fiddling. If you do well, put the cork bits on, get a couple of bolts in to hold it then the rest of them.

Do everything else in reverse order now, making sure everything is tight, except the sump bolts, which I tightened up with a socket using my hands instead of the ratchet. I'm not that strong so I could make it as tight as my hands would allow and I reckon it's just about right. How do I know? For the first time in five years, the car doesn't leak oil!

Oh, and cork tends to compress, so schedule a re-tighten using the same method in a week or two.
If you use a ratchet to tighten the bolts, you will break the cork and the oil will leak again. I remember this well from the first time I ever did this!

Rust repairs

I'm simply not up to some repairs and cutting out rusty bits and welding mean I had to leave it to the professionals.
Black Edge in Bayswater, like all body shops, aren't cheap, but I've found that they're very thorough. The Val had a lot more rust than initial inspection suggested so it was a lot of money and two weeks without the car, but she's as solid as new now.
Three areas were attended to:
1. Left rear panel (inner and outer)
2. Right rear panel (inner and outer)
3. Plenum/firewall.

#3 is really really common, and I think that living at Torquay for nearly four years made all of these much worse than they should have been.

The rear panels can be bought from a place in Queensland for $125 a piece. The guys told me it was much cheaper buying these than getting them to make them.

This was a few weeks ago. Yes I've been neglecting maintenance issues, mainly due to financial constraints. The weekend just gone I did another job that's been hanging about for a few years.

Sunday, December 28, 2014

Engine not running right, overheating

OK, the car was not idling and was overheating at the drop of a hat at the start of Summer. Why is that? The answer wasn't obvious at all!

Compression test.
Most cylinders showed 135PSI, one at 105, lowest at 100.
I suspected a blown head gasket, so off with her head!
The gasket was OK, but the valves looked a bit the worse for wear: Pitted and with black crap coating the back.
More disturbing was that there were two water holes which were blocked by the gasket. No wonder it was overheating. The new gasket had the same blockages on both sides (front and rear) of the engine. I made holes for it, as you can see:
Engine with new gasket
It's the big one with the big red ring around it. No idea why it was not punched out, it might have been a tooling error.
Jobs to do:
1. Make holes in gasket. Your gasket might already have them if you're lucky. My dad was very surprised this one didn't.
2. Clean the head.
3. Remove then grind in valves.
4. Reassemble

The longest task is #3. Grinding or lapping in the valves is very time consuming. The head was unlikely to have cracked or warped so I didn't get it checked. Cast iron is very rugged.

The gasket was very hard to make holes in. A drill with the round hole attachment is a good choice. It's not like a regular gasket, it has metal in the middle.
The head cleaning just required a wire brush attachment. I did this then removed the valves, which requires a special tool that looks like a big G clamp. I cleaned up the valves and inspected them. They were OK, but pitted and they needed to be lapped in again.
This is the time-consuming bit. It requires valve grinding paste, a little light oil or thinners and a sucker.
Place sucker on valve

paste
Place the sucker on the valve and a small amount of the coarser paste around the valve, where it contacts the head with a drip of something lighter (thinner is ideal) which reduces the friction. Grasp the stick between your palms and rub like you're starting a fire with it. Also, lift the valve every so often. Not sure why but my dad swears it's important. When it feels smooth, remove the paste and inspect the surfaces. If they aren't completely smooth (you can still see the pits) repeat. I had to do this between 6 and 10 times before it was smooth. When it is, finish it with the smooth version at the other end of the tube, just the once. It took me two hours to do 12 valves.

OK, reassembled the head, connected everything and dad told me the valve clearances will need to be set. This is another place where you really need to be careful. The slant six requires the engine to be running and hot to adjust this. The setting is 0.010" (ten thousandths of an inch) on inlet valves and 0.020" in the exhaust valves. Now this is important don't fail to set the valve clearances again when the engine has warmed up.
I did, and had it running on five cylinders until I'd worked it out. The adjuster is 7/16" so get a ring spanner and re-adjust. You'll find the idle speed will change radically if yours was anything like mine.
I'd also bought a tune-up kit at the tip shop and it included a vacuum gauge. This is useful for getting the idle mixture right. Maximise it and your car will love you.
Mine seems to love me now. She idles better than ever (as in has literally never been this good) and is smooth and powerful. Also doesn't overheat as easily. Have to get the radiator sorted out next and I just might get through Summer!

Saturday, January 4, 2014

Finally fixed the cooling

Well, after two weeks with the new system, I went back to the old one. Here's why:
No matter what I did, there was a massive delay from turning on the fan to dropping temperature. Another problem was that the system wasn't pressurised properly. Firstly not at all, so I blocked the overflow. Still made me very nervous. In the meantime Dad removed the top of the car's original radiator (with heat) and checked the flow through the core. Quite a few of the passages were blocked with "rust and shit" (don't blame me, I'm just quoting). He cleared these and soldered the top on again. I decided to play it safe and:
1. Keep the a/c fan
2. Keep the six bladed fan I was using before the electric experimentation
3. Use the long fan spacer

The radiator leaked, probably through one of the formerly blocked passages. Stop leak fixed this up and even on a hot day the temperature barely gets to half way.
Moral is: Restore the car, don't try and update.

Another Summer and more cooling problems

Well, since the crappo Chinese fan seized and the crook who sold it never sent me a replacement, I decided to do things my way.
Went to pick-a-part and picked up a radiator from an Alfa, transmission cooler from a BMW and a fan from a Mercedes.
The range of bits was for good reasons.
The radiator had to be a certain size. Well, it had to be about the same size as the Valiant one. The Alfa was perfect (really, almost exactly the same size) as well as being quite thin. I got the fan that was on it. All this for $103.50.
Transmission cooler was from a different wrecker: One near my dad's and they charged $36! Hell, that's expensive.
Can't remember what the merc fan cost (got it ages ago) but it wasn't very much (also from P.A.P.) - probably about $25.
OK, so radiator almost went straight in. Both hoses were on the driver's side like the Val, and I set it up so the bottom hose went into the new one. Got a couple of rubber blocks to set it on and found out that it also lined up nicely with two factory drilled holes in the bottom support panel! Just had to secure it at the top, but out it came and the trans cooler had to go in first. I'll get pics tomorrow. It's nearly finished now but I just haven't taken pictures yet.
The cooler had to be modified. I cut it off at the rubber hydraulic hoses and for the Val, I hack sawed the pipes back to the steel. When this had been done I thoroughly cleaned up the cut and the inside of the pipe. The adapters that go into the radiator fit into the end of the steel pipes like a glove, so I screwed them in. They were quite secure, but I unscrewed them, mixed up some industrial strength araldyte and spread liberally onto the threads before screwing back in. Left them for 24 hours to set before tightening.
So, cooler, radiator and original fan... No, the original fan is massively too wide. I tried to modify it to fit (it had a steel shroud damn it!) but no go. Mercedes fans are an amazing combination of heavy duty and efficient design. It was easily half the width of the Alfa fan, so on it went. This required a bit of stuffing around but I got there  in the end. Radiator must not touch the fan housing or the transmission cooler. All of these things would rub holes in each other so make sure they don't touch.
OK, so the Alfa radiator has a thermostat, so I have to learn what sort of output it has and rig up a thermo switch to come on automatically, cool the car down and shut off. The temperature of activation must be higher than the temp of deactivation. If not, it would be coming on for a few seconds at a time every few seconds! Not what we want, so we have it come on around, say, 90 and switch off around 85. It'll have to heat back up to 90 until she kicks back in.
I'm currently researching this feature but there's plenty of information about cheap or free ways to accomplish it.
Also have to get the A/C to activate the fan, or even put in a second one. I did buy two so it's possible, but I'll see how she runs with only one. Thursday will be a good day to test it out, seeing as it's expected to be 40 in Melbourne!

Sunday, May 19, 2013

The Electric Fan part 3

The two thermo switches I got from the wrecker were rendered useless: I heated one of them with a blow torch (then discovering they're very sensitive) and dropped the other on the concrete floor, breaking it instantly.
So, what to do when the world seems to be letting you know it doesn't want you to is to stop trying to do it. I fitted a nicer switch on the inside of the car and made it slightly more secure (but still hanging down from the dash). Since it's Winter now, I rarely have to even switch it on, provided I avoid heavy traffic (*very* difficult in Melbourne these days).
Found out the following about how it heats up:
1. Putting the car into neutral when coasting downwards (don't speed, though) is great for reducing the coolant temperature.
2. Putting the car into neutral at red lights no longer has any cooling effect, since the fan is now gone, so doing it is now a no-no.
3. Provided I never forget to look at the gauge every minute or so, the car will always operate at the right temperature.
4. Rain doesn't necessarily cool it better.
5. Cold air does. Driving through the mountains saw the temperature gauge drop quite a bit.
6. Travelling at 60-70KM/H is good for cooling, 80 is OK, but 100 will heat the coolant. The engine has to work proportionally harder at 100 to overcome the additional air resistance and produces much more heat, whereas at lower speeds the wind blowing through the radiator is more cooling than what the engine produces.

The car seems to use less fuel, and (this could be imagination, but) it also seems more responsive.

Thanks for reading.

Tuesday, April 9, 2013

Wheel Alignment Explained, simply

I just did a search for someone to align the wheels on the little woman's Verada. I found this Kmart tyre and wheel have a beautiful animation here that perfectly explains what caster, camber and alignment of your wheels do. All we have to do, as older car owners, is ignore the struts and just look at the angles.

Amazingly useful animation, I think. It took me about three hours of research a year or two ago to find out this same information and put it all together. Watching and playing with this flash will explain it all in a few minutes.
EDIT: It's obviously been taken from a U.S. site (that car's steering wheel is on the wrong side)

Saturday, March 9, 2013

Electric fan again

Well since it was about 35 yesterday, I decided to take the Valiant to pick the little one up from school. When it got to operating temperature, I just left the fan on. To further test it, I turned the air conditioning fan to full and the thermostat to the coldest setting. In stages of course since I didn't want the embarrassment of being stranded. It all worked really well, and I left the fan on a few minutes after stopping each time to prevent the usual heat build up, which all too often leads to an embarrassing blowing off of excess pressure (and water).
Also during Friday I visited the wrecker and got a nice looking volt meter from a Magna (well, it was probably put together in the same factory). Have to put it on yet, but it tested OK. Should then be able to tell if we ever get a case of over voltage or if the alternator just dies.

I also picked up a different thermostat: One I had a threaded nut for. Although I haven't faltered yet with turning the fan on and off, it'd be nice if it were taken care of automatically. This will be a job for next week.

Drive safely, preferably in an old Valiant, of course.

Monday, March 4, 2013

A few improvements

OK, last weekend was a big one for the Valiant. Several improvements made, and the car is better by far.

Electric fan

Pulled out the heavy one and put the electric fan in. Took ages (about 6 hours) and had to be offset, due to the water pump being in the way. Had to put another relay in since the fan draws a few amps. Did this first, and the ammeter went nuts every time I turned the fan on.

Bypassing the firewall plug

I did the improvement mentioned last post. A simple wire to connect the alternator with the starter relay. Now of course the ammeter doesn't work (sits at zero). I have to look out for a volt meter to replace it or turn the ammeter into a volt meter. I'm thinking the second option is preferred. It's more difficult since the thing will have to be calibrated but considering over-voltage killed my last battery it's essential to get one soon.


Linking the central locking to the alarm


Luckily (or it may be normal) the alarm has the ability to activate the central locking. Mine pulses a 400mA signal. The only way to get it working is to use two standard (bosch type) relays.
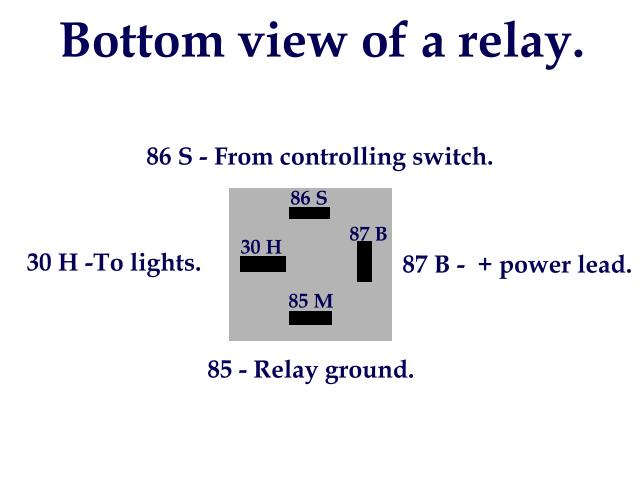
Here is how a relay is wired (taken from http://www.pbase.com/image/35092434.jpg):

The activation signal is (in my case) wired with a 12V wire at the other end. Activation signal from alarm to 87, battery to 30. This will allow the other two terminals to bridge. Other terminals are 86 to earth (a good one) and 87 to the central locking's "lock all" signal wire.
Do the same with the unlock.

Next plans

Put a relay in the headlight circuit, a bigger alternator and electronic regulator.

Thursday, February 28, 2013

Battery renewal

The Valiant's battery died a few weeks ago so I went and got another. This one is the heaviest duty one I could get, since the old one was only two years old.
The battery guy asked if the voltage regulator was OK, since over-voltage will do this sort of damage (acid everywhere, very low voltage, battery not charging). I shrugged and said "presume so. It's fairly new". It was also only a year or two old (probably less), but I got the old multimeter out and checked. Seems the guy just saved me another $160 (I stopped measuring when it got to 16.5V and turned the engine off). Buy one here and you will pay $125 (pentastar) to about $200. In America, you'll get a brand new one for about $2.95 but only if you live there. Those who sell to us charge about twice this. I landed one for a bit under $12, but it took two weeks. Now the Valiant is up and about again, and I have to wonder why the massive price difference. It's not the usual twice or three times as much like we're used to. We're charged over forty times what the Americans pay. No wonder the Internet is so popular. Unfortunately I missed the Ballarat swap meet because of the time taken (it arrived the day after).

When I was investigating the regulator, I found out that the Valiant's Ammeter is a major point of failure. No other car manufacturer threw 100% of generated current through the firewall (twice). This is bad, because as the car ages and the wires start to corrode, resistance increases. The physical effect of this is that the wire gets hotter. Frequently, the connectors melt (they are plastic) and everything short-circuits. It scared the bejesus out of me and I'll make conversion to a volt meter and re-routing of the alternator output. Here are some relevant references:
Replace your alternator and regulator with electronic variety
Explanation, and instructions on re-routing the wiring and replacing the ammeter

Monday, January 7, 2013

Hot weather and how to keep the old girl cool

When you have a classic car with A/C how do you keep it cool?

Here are some tips for keeping your car cool, from most easiest to less easiest ;-):

1. Clean your radiator, check your thermostat. I was amazed at how much rusty crap was blocking the radiator a few months ago. Clean it, as in take the radiator out of the car and tip it upside-down, hose it and buy some new concentrated anti-boil/anti-freeze. Also, very important to solder up any leaks or take it to get it fixed: Water leaks get worse due to the increase in pressure when it's hot. While you're at this, check your thermostat. If it works OK but your radiator isn't the best since they're all old and most have a few blockages, you can reduce the possibility of overheating by fitting a lower temperature thermostat. this makes the engine run slightly less efficiently, but I'd rather it use a little more fuel than break down at the first traffic jam. In Melbourne, very heavy traffic is a given and a nightmare for old cars.
2. Fit a better fan. The std fan for the Valiant 225 is a four blade. This is crap really, and at a recent (Bendigo, Nov 2012) swap meet I got a chromed hemi 6 bladed chromed fan (although the chrome has seen better days) for $10. This definitely made a big difference, but the car still overheats on really hot days (like last Saturday, 40°C). Bloody heavy fan but it pulls a lot more air through. It made a difference straight away, and the Val would definitely have failed on me before now if I hadn't done this.
3. Fit a shroud between the fan and the radiator, as close as possible to the fan. This forces more air to come from the front of the car into the radiator, rather than from around the engine bay. I modified a modern plastic one, pulled off a Volvo. Doesn't matter if you cut, glue, tape, screw etc. it together if you just want the effect.
4. Fit an electric fan. I bought one but haven't fitted it yet. It's the narrowest large diameter electric fan I could find ($60 ebay, sent from QLD) because the A/C compressor means there isn't much space. Electric fans have the advantage of efficiency: They don't operate when the water's cold and since it's not driven by the motor they don't take any effort to run (you get more horsepower and better fuel economy, and it gets better at higher engine speed like extractors). That said, they do require electricity, and when running, the alternator produces more drag on the engine. However, it's the best solution and the most difficult (I haven't done it yet). You'll need to completely remove the manual fan, of course, and possibly fit new screws (in case you need to put back the old fan which you should keep somewhere handy).
5. Check/renew your water pump. If your water pump is an older one or you have been a bit slack in putting the green inhibitor in the water it'll be corroded, and much less effective. It's easy to remove the pump and check this. If your pump is badly corroded, get a new one. I have a new one in the shed (hmm.. might start keeping it in the car - you never know) and they're not expensive or hard to find (auto surplus in Mitcham usually have them in stock, or even Repco). If your old one was corroded, you'll notice an immediate improvement.

Here are a few driving tips:
1. Is your car an automatic? If so, put it into neutral at the lights: Melbourne has the worst traffic and sitting at the lights is what overheats your car. Here's why: Your car idles slow in neutral, slower in drive, and it seems that although the faster idle creates more heat, the faster fan speed as well as the faster water pump more than makes up for this. I've tested it and in drive, my car overheats much faster than in neutral. If the traffic lights are known to take more than a minute to change, turn the engine off.
2. With aftermarket A/C you usually have a thermostat dial: When at the lights, turn it to warmer (less cold) and have the car in neutral. When not at the lights have it cooler.
The A/C heats your coolant up in two ways:
i. Dragging on the engine, slowing it down and creating more work for it.
ii. The condensor (at the front of the radiator) is the hot part of the heat exchanger, and heats up the air before it gets to the radiator (it sits in front of the radiator).

If your car is overheating, choose all or some of the following to slow or stop it (depending on the circumstances):
* Turn off the A/C.
* Stop the car. The water temperature will appear to go up rapidly when you do this and the radiator may blow out some water due to the pressure.
* Turn on the heater. This will provide additional cooling, albeit at the expense of comfort.

When you stop the car whilst overheating, it will probably blow some pressure in the form of water and/or steam. This is normal and nothing to worry about. If you're wanting to just put in some more water either wait for the engine to cool down (like, an hour) or throw a cloth over the radiator cap and remove it (note: It's really dangerous to remove the cap from a hot engine) then with the engine running pour in some water. If you don't have the engine running, the temperature difference once you start the engine may crack the block or head.

So to summarise:
* Flush your radiator by removing it

OK, that's Mike's tips for driving in the heat. I didn't drive the Val today: Took the missus' Verada instead (mmm... thermostatically controlled electric fan). Told you I hadn't installed the electric one yet: Might do so this week.
Mike

Tuesday, October 30, 2012

Unemployment really curbs the restoration

Well, not that I'm restoring the old girl, but having no money means that when (for example) the A/C lost its R134a (a few weeks ago - loose fitting at the evaporator), I can't even pay for a re-gas (yes, poor me, there there). Trying to convince oneself that the quarter vent open all the way is just as good will only work until Summer really hits :-( Probably have to do it anyway, considering my ten year old bundle of... well, something (love you sweetie, really).
This car will not be restored, ever. I love it as a daily driver and will continue to patch things up (properly) and drive it, and enjoy it.

Fuses

My attempt earlier in the year (April) to replace the original fuses with one from a Hyundai ended up with my throwing the new part away and investigating the old one. Although basic, it actually works very well until one of the fuses blows, which stops everything connected to it from working. I found out that my wipers and interior light were connected to the fused side. Here's how it works:
There is one power feed from the battery (always on) and one from the ignition (only one with the ignition). Keep a good supply of 15A fuses (a packet in the glove box), you have four options for any device you connect.
Do you want it fused or not? Do you need it on all the time. I'd recommend not putting the wipers on the fused end. For that matter the interior light shouldn't be fused either. If you have an alarm and the interior light doesn't work, neither will your alarm!
Definitely have the heater (and A/C if you have one) on the ignition side, and I have mine fused in case my stupidity or carelessness results in a short circuit (disconnection prior to working on the electrical system is advised here. Take note, me).
If you want extra safety, put in-line fuses on your devices. I've found it's so much easier to use the simple system Chrysler engineers put there.  Oh, and the diagram was just drawn by me: It won't necessarily look exactly like the fuse connector (which is more square and has a plastic cover). The fuse connector is located about halfway along your dash, and is secured with a screw. Remember that before taking a screwdriver near it, one part is connected directly to your battery!

Wednesday, August 22, 2012

Free Wheel Alignment for the old girl

A while ago I replaced the DS wishbone and ball joint. My Valiant guy's advice was to spray paint over the blah blah adjusters and I won't have to do a wheel alignment. After I replaced it, it was obvious I'd sprayed in the wrong place and so the wheel alignment was horribly out. The best thing I could do was to adjust the camber by eye for the driver's side (that's what DS is, incidentally) and take it to an alignment place later.
Alignment people said they could do a toe-in only alignment for $35 odd, but that a proper alignment would take a couple of hours at $85-$110 an hour! Needless to say I didn't take them up on it. About 6 weeks ago I happened to buy something off ebay for my daughter and picked it up where the guy worked (wheel and tyre place). He said he couldn't do an alignment until next week (it was about 15KM from home, so that was a no) but that it looked like a good job I'd done by eye.
Finally had enough of vague steering this morning and went to my Dad's place. He was a mechanic and is very good at improvisational car repair. He made up a camber tool with a spirit level and piece of angled aluminium, which he cut to the exact diameter of the rim. Placed the aluminium against the rim and the level against the aluminium (the aluminium piece was effectively an adaptor, needed because the level would be fouled by the tyre). The setup was made as vertical as possible and the bubble observed. What we should see was almost level but out very slightly at the top. I.E. \               /  
This is exaggerated of course. The angle should be about 0.5 of a degree.
Results? It seems I had the DS absolutely spot on, but surprisingly the PS (passenger side) was waaaaay out! Surprising since I hadn't touched it at all. It must have been like that for years. To fix it, I first of all measured the length in mm between the front and rear bolts and the panel on the inside. I moved it in by 3mm on both F and R, tightened the bolts, measured again, put the wheel back on (couldn't get at the bolts without removing the wheel) and moved the car back about 3m then forward (I don't trust the push down on the bonnet method of levelling). Measured with the level again and it was perfect. So, did a toe-in check, then correction, since adjusting the camber changed this then a test drive. Although it's not like power steering, it's noticeably lighter. Also, the steering is much more predictable than before which certainly makes me fell better about jumping in and taking my 10YO to school. Dad advised me to swap front and rear tyres (which I did), since the PS front is now looking a bit scrubbed thanks to running on the outside for so long.
Still a lot to do but at least she'll point straight and true :-)
Happy motoring!

P.S. The toe-in adjustment is very easy. You just need a steel measuring tape and (optionally) a piece of masking tape. With tyres facing perfectly forward, measure the distance between the two front tyres at the front-most part (that you can reach - the engine and chassis get in the way) then the rear-most part. The tyres should be 3mm (1/8") closer together at the front. If they aren't, adjust by loosening both parts of one side's tie rod ends and adjust. Tighten TREs, roll car back then forward about 3m and measure again. If you have a helper or really stiff measuring tape, you won't need the masking tape.

AC dead

Well, it seems the AC evaporator was dodgy. The fan started making noise about 6 months ago and I stupidly thought "Can't be anything wrong with it. It's brand new". Well, now I reckon it probably wasn't new (argh!) because the motor seized up and now it's just blowing fuses when I try and use it.

Well, all that trouble for nothing. Advice for anyone wanting A/C. Do it yourself or pay someone to do it. If you make a deal, get it clear and in writing.

Tuesday, January 24, 2012

AC guy, soul and conscience-free solicitors and damage repair

I won't be recommending the AC guy, because of a couple of things. He broke my heater core (green water leaked all over the new carpet), removed the gasket between heater box and air intake, then renegged on the deal that we had. He kept changing his mind about what he wanted and finally said the deal was off and he was unilaterally changing it so I had to pay him a heap of cash! If I didn't pay? He threatened to "send the boys round" to collect this fictitious money. He also refused to acknowledge the damage to the heater or the removed gasket. The gasket is actually a large piece that seals the air. Without it, the air box is effectively always 100% open! My 9YO daughter didn't approve, particulary returning from Bendigo through the mountains during Winter.

So with that, I now agree with my mate Dave, who has a '74 Charger. He said he has never found a mechanic in any field who does things properly. I'd thought he was just cynical but every time I've not done something myself, I've been disappointed.

I dropped the car in a few weeks ago to have the wheels balanced and was extremely nervous when it took longer than expected. It was almost certainly due to the floor guys not knowing about the Val's left hand thread on the passenger side and turning the impact driver up to 11. The nerves were because this will damage my rims. The spot where the nuts sit when tight gets thinner every time someone does this and you will eventually have to throw the rim away or risk the wheels falling off while you're driving.

So now the damage from last October is finally being fixed. The one week in December at the repair shop started but when they finally got round to starting it (on Wednesday. It had been sitting doing nothing for Monday and Tuesday!) they hadn't contacted the bumper bar people and I had to go get the car and re-book it (sigh). So, last week it was finally booked in again. Nothing by Friday, so I contacted them. They had decided to keep it for another week because the aforementioned bumper bar repairer were dragging their heels! Of course, they hadn't thought to let me know I would be without my car for another week. Who would really miss their car an extra week anyway?!? This is almost three weeks they've needed to fix some very small damage. Thanks a lot Dave, you were right again.

Had an accident on 19th Dec in my GFs car. A taxi performed a rapid left hand turn from the right turn lane of Spring St, Preston. Pretty obvious whose fault it was, since I was going straight ahead and the driver was definitely familiar with the post accident procedure. Received a bill yesterday from a solicitor for the damage to the taxi, three days lost wages and their expenses in issuing the threat to pay. They stated it was 100% my negligent driving that caused the accident (apparently I caused him to put his indicator on then violently accelerate into my rear wheel arch). My GFs insurer said that this solicitor represents the taxi company, who has no insurance (really. I thought this would be necessary, given the number of accidents they cause) and they were very aggressive in pinning the blame on the innocent party. Occasionally they also win in court. This would obviously necessitate their side lying about what happened and where it happened. Really, you see it on the news and on drama series, but do people really do this for a living and sleep at night? Sure the AC guy lied about quite a few things, but that was mostly about his ego, and the money he demanded was part of this, since to him it meant he was therefore right about everything. These solicitors know they are lying. They know they should just pay up. They know I am the victim already, yet they are OK with suing me for thousands of dollars and making me pay for the repair of my own car too. Yes Dave, I'm sure you knew about this too but I don't feel great about it.

Tuesday, November 29, 2011

Engine Reassembly

This is pretty easy if you take care. First of all, prepare the bore unless you had it rebored. If you didn't you will see that the bores are very shiny where they have been rubbed for many years by the piston rings. You will need to remove this by honing the bores. This is simple enough, as you can buy a drill attachment. Hone the bores in a criss-cross pattern until there is no perceptible ridge and no glaze. Lubrication with WD40 or light oil is helpful (prevents the stones from overheating). Clean away the oil/grit/filings very thoroughly as anything left will damage the newly rebuilt block.
Oil the rings on the pistons thoroughly and use a ring compressor to get the pistons in the correct way. They should be put in with arrows facing a particular direction, from memory, and will probably be numbered, too. The numbers are less important, but if they're there use them.
Insert new crank shaft bearings and attach. Torque to the correct setting. If you need any of this info, just ask me or Google it, as I'm sure it'd be freely available.
If you have removed the timing case like I did, you will need to align the marks on the pulleys prior to putting the timing chain back on. This is really important: My Dad didn't get it right and it was out by 1 cog. Result was the car had no power and we had to remove the engine again to do it right!
Put the timing case back on with the sump (see below). The engine should be on TDC now.
Put the head back on and torque it up. The engine guy said that even monotorque gaskets should be re-torqued. Schedule this now. If you can't do this because it keeps moving make a note for yourself to do it as soon as the engine is back in the car. If you're a bit absent-minded, put a sticky note over the ignition to remind you.
Lift the engine up with your lifter (or block and tackle) now and put the sump/timing cover on.
The sump should be cleaned and a new gasket with lots of gasket goo will ensure you won't have any dramas with leaks. Use the torque settings again for everything. An oil leak will spoil your pleasure at the end of this and it's extremely difficult to tighten sump bolts with the engine in.
Prior to engine installation I also painted the engine. Couldn't get Chrysler engine blue so did it Ford blue. In retrospect I shouldn't have done this. The paint place in Preston (at the forking of Plenty Road) had the stuff, but I didn't know this.
Putting the engine in was the reverse of removal, with particular attention paid to the alternator and distributor. Torque the head if you couldn't before.
Make sure the distributor goes in with the rotor facing #1. If you didn't mess with the valve timing this should go back in easily and look like the photo you took beforehand. You also should not have to do with the valve clearances if you put the rods back in the same holes, unless you needed to do them anyway. If you do, start the car, warm it up, turn it off, remove the rocker cover, Turn it back on and do it while the engine's going. This is a lot easier and quicker than doing it by turning the engine over by hand.
If you want to (I didn't) you can re-check the compression to make sure it matches that in the book, and that it's consistent between cylinders. The Valiant now runs like it should. It idles much better and is better on fuel (although fuel economy still rubbish on gas for some reason).
Here are some photos of the reassembly.
If your steering's heavy, lubrication is easy with no engine

Engine Disassembly and Inspection

When it's out, I removed the head. When doing this, my Dad has always told me to keep the push rods in order, so they all go back in the same holes. Here is one way to do this:
Cardboard with holes, marked with corresponding cylinders
Simple and effective. The engine shop guy said it didn't matter how they went back in, but I like to play it safe. Disassembly of the engine is pretty easy but it was unbelievably messy. Make sure you drain the oil very thoroughly and disassemble near basins for excess oil and rags/brooms/turps for clean ups. The garage was in a very dirty state when we finished, even though I thought we were very careful. Also, you will want to clean your engine and engine bay. In retrospect I should have done this prior to starting the job.

The various bits that were removed prior to the engine.
Engine, during disassembly
The aim was to remove the pistons. When this was done, we found that several rings were actually broken. Further good news was that the piston ring grooves were worn, so new ones were needed. An old piston was cleaned up and taken to our local engine shop (C.W. Engines in Beech Street, Vermont). New pistons and rings set me back around $300, which was much better than expected, and a new bottom end gasket set was another $65 (got this from Auto surplus in Mitcham). Obviously new oil and filter are necessary for this job. New pistons and rings mean this will be a "rebuilt" engine. Reconditioning, on the other hand, involves a rebore and doing up the head. I didn't want to rebore it, since the ridges were very small. This means the ridges at the top of the cylinder bore: If they're obvious, a rebore is necessary. The thing about a full recondition is that your engine then has to be treated very carefully as it's run in. This means a set of rules which, frankly, I wouldn't be very good at adhering to. Occasional hard acceleration, but mostly very slow and gentle. If you're old enough, you will recall when people used to do this and they hung a sign on the back of their car which usually said "running in". Ah, better go around them, you would think. I avoided reconditioning mostly for this reason, but also the additional expense, delay (you have to book it in) and that initially the compression is so great that you will nearly always have trouble starting the engine after assembly.

Engine Removal


This procedure is pretty straight forward.
Take photos as you go: There is nothing more valuable than a digital camera (I mostly used my mobile's camera) when doing this, unless you have a photographic memory.
Transmission: You don't have to remove your transmission (I have an auto) but you do have to either suspend it with strong wire or rope to the car (the wiper motor is pretty strong)  or put a jack underneath it, or both, and also push the torque converter away from the engine and keep it there: If you don't do these things, the front of your trans will drop onto the floor, possibly damaging the mounts and the torque converter will separate from it, releasing about four litres of transmission fluid, also on the floor. This warning is more to avoid the mess than the expense and inconvenience.

Distributor: You will need to remove this, as it can very easily be damaged when the engine is moved. Mark the plug leads before removing the cap, as leads sometimes fall out. A pencil or ball point pen will do, unless you have black leads (if you do, use liquid paper) . I also put the engine on TDC with #1 in firing position then took a photo with the dizzy cap off. My photo of this was a bit rubbish, so I won't bother posting it.
Air conditioner: Does not have to be disconnected. Just un-mount the compressor and hang it to the side, out of the way.
Alternator: Take a shot of this before removal. If you connect anything incorrectly on your alternator, it will be disastrous.

Compression Test

At least it's still November, so this is still "shortly" to me.
Performed a compression test early September to find out if there was anything weak in the engine. If you don't know what this is all about, buy a compression tester from your local auto parts shop.
Compression test
Remove all the spark plugs and screw the tester into #1 spark plug hole. If you didn't buy a screw in one, you will need to hold the tester in place and get someone to help you. Look, just get the screw in one.
With it firmly in place, put your foot on the accelerator and press it to the floor. Now, turn the engine over. You'll hear the compression strokes move the needle of the gauge (sounds like puffing). When you've gone through three engine cycles, check the gauge. Repeat for the other cylinders and write down the results.
As mine is a 160HP slant, compression is expected to be higher then the 155HP version (red motor). I was hoping for 180psi, and got the following:
1 138
2 110
3 155
4 155
5 148
6 152
Urgh! Bloody awful. Definitely something (or things) wrong here. With these results, we look for a couple of things, being firstly the number, which is obviously quite low here and secondly whether the readings are similar to each other, which they are not in my case.
If there's any low numbers at all, you can determine if it's the head or piston that's causing the problem by doing a second test. This time, grab an oil can and squirt some in befrore screwing the compression tester in. The reason that we do this is that squirting oil in will seal any misbehaving rings and bring up the reading significantly if the problem is with piston rings. If the problem is with the head (e.g. valves are damaged or valve stems worn out) the reading will still be low.
With mine, the compression came up significantly as expected, since I had the head resurfaced, bought new valves etc when the LPG buggered it up about two years ago.
So I was going to have to remove the engine. Did this on 6th September.