When you have a classic car with A/C how do you keep it cool?
Here are some tips for keeping your car cool, from most easiest to less easiest ;-):
1. Clean your radiator, check your thermostat. I was amazed at how much rusty crap was blocking the radiator a few months ago. Clean it, as in take the radiator out of the car and tip it upside-down, hose it and buy some new concentrated anti-boil/anti-freeze. Also, very important to solder up any leaks or take it to get it fixed: Water leaks get worse due to the increase in pressure when it's hot. While you're at this, check your thermostat. If it works OK but your radiator isn't the best since they're all old and most have a few blockages, you can reduce the possibility of overheating by fitting a lower temperature thermostat. this makes the engine run slightly less efficiently, but I'd rather it use a little more fuel than break down at the first traffic jam. In Melbourne, very heavy traffic is a given and a nightmare for old cars.
2. Fit a better fan. The std fan for the Valiant 225 is a four blade. This is crap really, and at a recent (Bendigo, Nov 2012) swap meet I got a chromed hemi 6 bladed chromed fan (although the chrome has seen better days) for $10. This definitely made a big difference, but the car still overheats on really hot days (like last Saturday, 40°C). Bloody heavy fan but it pulls a lot more air through. It made a difference straight away, and the Val would definitely have failed on me before now if I hadn't done this.
3. Fit a shroud between the fan and the radiator, as close as possible to the fan. This forces more air to come from the front of the car into the radiator, rather than from around the engine bay. I modified a modern plastic one, pulled off a Volvo. Doesn't matter if you cut, glue, tape, screw etc. it together if you just want the effect.
4. Fit an electric fan. I bought one but haven't fitted it yet. It's the narrowest large diameter electric fan I could find ($60 ebay, sent from QLD) because the A/C compressor means there isn't much space. Electric fans have the advantage of efficiency: They don't operate when the water's cold and since it's not driven by the motor they don't take any effort to run (you get more horsepower and better fuel economy, and it gets better at higher engine speed like extractors). That said, they do require electricity, and when running, the alternator produces more drag on the engine. However, it's the best solution and the most difficult (I haven't done it yet). You'll need to completely remove the manual fan, of course, and possibly fit new screws (in case you need to put back the old fan which you should keep somewhere handy).
5. Check/renew your water pump. If your water pump is an older one or you have been a bit slack in
putting the green inhibitor in the water it'll be corroded, and much
less effective. It's easy to remove the pump and check this. If your
pump is badly corroded, get a new one. I have a new one in the shed
(hmm.. might start keeping it in the car - you never know) and they're
not expensive or hard to find (auto surplus in Mitcham usually have them
in stock, or even Repco). If your old one was corroded, you'll notice an immediate improvement.
Here are a few driving tips:
1. Is your car an automatic? If so, put it into neutral at the
lights: Melbourne has the worst traffic and sitting at the lights is
what overheats your car. Here's why: Your car idles slow in neutral,
slower in drive, and it seems that although the faster idle creates more
heat, the faster fan speed as well as the faster water pump more than makes up for this. I've tested it
and in drive, my car overheats much faster than in neutral. If the
traffic lights are known to take more than a minute to change, turn the engine off.
2. With aftermarket A/C you usually have a thermostat dial: When at the lights, turn it to warmer (less cold) and have the car in neutral. When not at the lights have it cooler.
The A/C heats your coolant up in two ways:
i. Dragging on the engine, slowing it down and creating more work for it.
ii. The condensor (at the front of the radiator) is the hot part of the heat exchanger, and heats up the air before it gets to the radiator (it sits in front of the radiator).
If your car is overheating, choose all or some of the following to slow or stop it (depending on the circumstances):
* Turn off the A/C.
* Stop the car. The water temperature will appear to go up rapidly when you do this and the radiator may blow out some water due to the pressure.
* Turn on the heater. This will provide additional cooling, albeit at the expense of comfort.
When you stop the car whilst overheating, it will probably blow some pressure in the form of water and/or steam. This is normal and nothing to worry about. If you're wanting to just put in some more water either wait for the engine to cool down (like, an hour) or throw a cloth over the radiator cap and remove it (note: It's really dangerous to remove the cap from a hot engine) then with the engine running pour in some water. If you don't have the engine running, the temperature difference once you start the engine may crack the block or head.
So to summarise:
* Flush your radiator by removing it
OK, that's Mike's tips for driving in the heat. I didn't drive the Val today: Took the missus' Verada instead (mmm... thermostatically controlled electric fan). Told you I hadn't installed the electric one yet: Might do so this week.
Mike
Showing posts with label tips. Show all posts
Showing posts with label tips. Show all posts
Monday, January 7, 2013
Monday, October 4, 2010
Some pictures of the Ford system
As mentioned, I took the camera along to the wrecker, since it's a hell of a lot easier to look at a comprehensive set of photos than it is to make notes. Really - that's a good tip: How do I know this is useful? I couldn't believe how many people see me take a photo before doing work on a car and say "Hey, that's a good idea". Until my dad, who has two digital cameras and a camera phone and works on a lot of cars, said it that I thought "maybe this isn't obvious to everyone". I'm a fundamentally lazy person, and to qualify this, here is how my mind now works:
1. Preparation is really important. Too many times I've just jumped into a project then realise that firstly I don't have any, for example, gasket cement. Or, maybe the part isn't identical to the one I took off. Whatever it is, in the past I have had to make multiple trips to the wrecker, autobarn, the hardware shop, etc. A simple 'phone call to the engine shop tells you in advance that, say, they won't get around to machining your head until Thursday, so you can plan around it and not remove it until Wednesday. Prep will save you a lot of time.
2. Take photos. A picture is more than worth a thousand words. Don't rely on your repair manual. If you have in the past you should already have uttered the words "bloody crap manual!". If you're thinking "My God, that guy's psychic" I'm not: Everyone has had the same experience. Take the time to take good photos. Pay particular attention to wiring, even if you think you know where everything goes. Take multiple angles before you start. About 90% or more of your photos will be before or during disassembly/removal. Anything you do afterwards is just for your ego anyway - unimportant. Good photos will save you time - take your camera to the wrecker.
3. Never, ever rush. If you expect a job to take an hour and you have to leave in just over an hour, don't start the job. My dad (was a mechanic for many decades) said to expect all jobs to take twice as long as you expect. I found that sometimes even that was very optimistic, but if you leave two hours for the one hour job and it actually only takes an hour (I have found this to be the very rare exception), that's a bonus.
4. Don't get angry. Think about it: Why get angry at metal, plastic etc. It's not trying to piss you off. How can it? Giving you advice to calm down is what I won't do: If you become aware that you're getting angry at the nut that just won't turn, stop trying. Take yourself away from it for a minute. Cup of tea, toilet break etc and you'll probably come up with a new plan on the way back to the garage. Getting angry will set you back and you may break something expensive.
5. Concentrate. When you are taking off the manifold, that's all your mind should be doing, and not thinking about last night or what you'll be doing later. Concentrate as completely as you can on the task you're doing now and not thinking about anything else will add quality to the job. You won't forget to tighten nuts and you won't take short cuts.
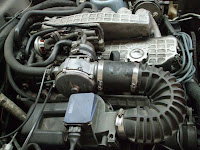
OK, here's the engine bay. It's clear that the car was on LPG here. I noticed that the gas converter (far side of the bay) was an "OHG". I did an LPG course in 1991 and OHG (over the hill gang, older Impco workers made redundant who started their own factory) were popular then. They haven't existed for some time now so I didn't take it. My car already has LPG so I'll use my own converter with the inline mixer you can see in the picture.
Here is most of it later that day, on the back porch.
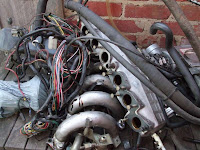
Might have mentioned this already, but my dad was rather annoyed at my wanting to get the entire EFI wiring loom. I considered it a massive time saver. As well as the useful connectors, it will only work in the same layout as the original. What I mean is that if you try to connect the knock sensor, for example, only the right connector will reach it comfortably.
The manifold is fantastically well constructed, and in multiple parts. It would be great if I could use this on the slant, but I measured the lengths this morning and the slant is significantly longer. Well, I already bought the slant EFI manifold, so I'll be heading to the engine shop this afternoon to get their advice and get some prices. Will be calling two of the usuals beforehand. More later.
1. Preparation is really important. Too many times I've just jumped into a project then realise that firstly I don't have any, for example, gasket cement. Or, maybe the part isn't identical to the one I took off. Whatever it is, in the past I have had to make multiple trips to the wrecker, autobarn, the hardware shop, etc. A simple 'phone call to the engine shop tells you in advance that, say, they won't get around to machining your head until Thursday, so you can plan around it and not remove it until Wednesday. Prep will save you a lot of time.
2. Take photos. A picture is more than worth a thousand words. Don't rely on your repair manual. If you have in the past you should already have uttered the words "bloody crap manual!". If you're thinking "My God, that guy's psychic" I'm not: Everyone has had the same experience. Take the time to take good photos. Pay particular attention to wiring, even if you think you know where everything goes. Take multiple angles before you start. About 90% or more of your photos will be before or during disassembly/removal. Anything you do afterwards is just for your ego anyway - unimportant. Good photos will save you time - take your camera to the wrecker.
3. Never, ever rush. If you expect a job to take an hour and you have to leave in just over an hour, don't start the job. My dad (was a mechanic for many decades) said to expect all jobs to take twice as long as you expect. I found that sometimes even that was very optimistic, but if you leave two hours for the one hour job and it actually only takes an hour (I have found this to be the very rare exception), that's a bonus.
4. Don't get angry. Think about it: Why get angry at metal, plastic etc. It's not trying to piss you off. How can it? Giving you advice to calm down is what I won't do: If you become aware that you're getting angry at the nut that just won't turn, stop trying. Take yourself away from it for a minute. Cup of tea, toilet break etc and you'll probably come up with a new plan on the way back to the garage. Getting angry will set you back and you may break something expensive.
5. Concentrate. When you are taking off the manifold, that's all your mind should be doing, and not thinking about last night or what you'll be doing later. Concentrate as completely as you can on the task you're doing now and not thinking about anything else will add quality to the job. You won't forget to tighten nuts and you won't take short cuts.
OK, here's the engine bay. It's clear that the car was on LPG here. I noticed that the gas converter (far side of the bay) was an "OHG". I did an LPG course in 1991 and OHG (over the hill gang, older Impco workers made redundant who started their own factory) were popular then. They haven't existed for some time now so I didn't take it. My car already has LPG so I'll use my own converter with the inline mixer you can see in the picture.

Here is most of it later that day, on the back porch.

Might have mentioned this already, but my dad was rather annoyed at my wanting to get the entire EFI wiring loom. I considered it a massive time saver. As well as the useful connectors, it will only work in the same layout as the original. What I mean is that if you try to connect the knock sensor, for example, only the right connector will reach it comfortably.
The manifold is fantastically well constructed, and in multiple parts. It would be great if I could use this on the slant, but I measured the lengths this morning and the slant is significantly longer. Well, I already bought the slant EFI manifold, so I'll be heading to the engine shop this afternoon to get their advice and get some prices. Will be calling two of the usuals beforehand. More later.
Subscribe to:
Posts (Atom)