Showing posts with label slant 6. Show all posts

Monday, March 4, 2013

A few improvements

OK, last weekend was a big one for the Valiant. Several improvements made, and the car is better by far.

Electric fan

Pulled out the heavy one and put the electric fan in. Took ages (about 6 hours) and had to be offset, due to the water pump being in the way. Had to put another relay in since the fan draws a few amps. Did this first, and the ammeter went nuts every time I turned the fan on.

Bypassing the firewall plug

I did the improvement mentioned last post. A simple wire to connect the alternator with the starter relay. Now of course the ammeter doesn't work (sits at zero). I have to look out for a volt meter to replace it or turn the ammeter into a volt meter. I'm thinking the second option is preferred. It's more difficult since the thing will have to be calibrated but considering over-voltage killed my last battery it's essential to get one soon.


Linking the central locking to the alarm


Luckily (or it may be normal) the alarm has the ability to activate the central locking. Mine pulses a 400mA signal. The only way to get it working is to use two standard (bosch type) relays.
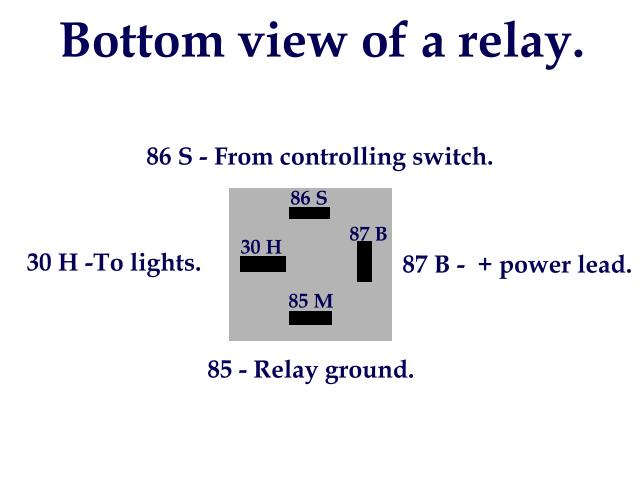
Here is how a relay is wired (taken from http://www.pbase.com/image/35092434.jpg):

The activation signal is (in my case) wired with a 12V wire at the other end. Activation signal from alarm to 87, battery to 30. This will allow the other two terminals to bridge. Other terminals are 86 to earth (a good one) and 87 to the central locking's "lock all" signal wire.
Do the same with the unlock.

Next plans

Put a relay in the headlight circuit, a bigger alternator and electronic regulator.

Monday, January 7, 2013

Hot weather and how to keep the old girl cool

When you have a classic car with A/C how do you keep it cool?

Here are some tips for keeping your car cool, from most easiest to less easiest ;-):

1. Clean your radiator, check your thermostat. I was amazed at how much rusty crap was blocking the radiator a few months ago. Clean it, as in take the radiator out of the car and tip it upside-down, hose it and buy some new concentrated anti-boil/anti-freeze. Also, very important to solder up any leaks or take it to get it fixed: Water leaks get worse due to the increase in pressure when it's hot. While you're at this, check your thermostat. If it works OK but your radiator isn't the best since they're all old and most have a few blockages, you can reduce the possibility of overheating by fitting a lower temperature thermostat. this makes the engine run slightly less efficiently, but I'd rather it use a little more fuel than break down at the first traffic jam. In Melbourne, very heavy traffic is a given and a nightmare for old cars.
2. Fit a better fan. The std fan for the Valiant 225 is a four blade. This is crap really, and at a recent (Bendigo, Nov 2012) swap meet I got a chromed hemi 6 bladed chromed fan (although the chrome has seen better days) for $10. This definitely made a big difference, but the car still overheats on really hot days (like last Saturday, 40°C). Bloody heavy fan but it pulls a lot more air through. It made a difference straight away, and the Val would definitely have failed on me before now if I hadn't done this.
3. Fit a shroud between the fan and the radiator, as close as possible to the fan. This forces more air to come from the front of the car into the radiator, rather than from around the engine bay. I modified a modern plastic one, pulled off a Volvo. Doesn't matter if you cut, glue, tape, screw etc. it together if you just want the effect.
4. Fit an electric fan. I bought one but haven't fitted it yet. It's the narrowest large diameter electric fan I could find ($60 ebay, sent from QLD) because the A/C compressor means there isn't much space. Electric fans have the advantage of efficiency: They don't operate when the water's cold and since it's not driven by the motor they don't take any effort to run (you get more horsepower and better fuel economy, and it gets better at higher engine speed like extractors). That said, they do require electricity, and when running, the alternator produces more drag on the engine. However, it's the best solution and the most difficult (I haven't done it yet). You'll need to completely remove the manual fan, of course, and possibly fit new screws (in case you need to put back the old fan which you should keep somewhere handy).
5. Check/renew your water pump. If your water pump is an older one or you have been a bit slack in putting the green inhibitor in the water it'll be corroded, and much less effective. It's easy to remove the pump and check this. If your pump is badly corroded, get a new one. I have a new one in the shed (hmm.. might start keeping it in the car - you never know) and they're not expensive or hard to find (auto surplus in Mitcham usually have them in stock, or even Repco). If your old one was corroded, you'll notice an immediate improvement.

Here are a few driving tips:
1. Is your car an automatic? If so, put it into neutral at the lights: Melbourne has the worst traffic and sitting at the lights is what overheats your car. Here's why: Your car idles slow in neutral, slower in drive, and it seems that although the faster idle creates more heat, the faster fan speed as well as the faster water pump more than makes up for this. I've tested it and in drive, my car overheats much faster than in neutral. If the traffic lights are known to take more than a minute to change, turn the engine off.
2. With aftermarket A/C you usually have a thermostat dial: When at the lights, turn it to warmer (less cold) and have the car in neutral. When not at the lights have it cooler.
The A/C heats your coolant up in two ways:
i. Dragging on the engine, slowing it down and creating more work for it.
ii. The condensor (at the front of the radiator) is the hot part of the heat exchanger, and heats up the air before it gets to the radiator (it sits in front of the radiator).

If your car is overheating, choose all or some of the following to slow or stop it (depending on the circumstances):
* Turn off the A/C.
* Stop the car. The water temperature will appear to go up rapidly when you do this and the radiator may blow out some water due to the pressure.
* Turn on the heater. This will provide additional cooling, albeit at the expense of comfort.

When you stop the car whilst overheating, it will probably blow some pressure in the form of water and/or steam. This is normal and nothing to worry about. If you're wanting to just put in some more water either wait for the engine to cool down (like, an hour) or throw a cloth over the radiator cap and remove it (note: It's really dangerous to remove the cap from a hot engine) then with the engine running pour in some water. If you don't have the engine running, the temperature difference once you start the engine may crack the block or head.

So to summarise:
* Flush your radiator by removing it

OK, that's Mike's tips for driving in the heat. I didn't drive the Val today: Took the missus' Verada instead (mmm... thermostatically controlled electric fan). Told you I hadn't installed the electric one yet: Might do so this week.
Mike

Tuesday, November 29, 2011

Engine Reassembly

This is pretty easy if you take care. First of all, prepare the bore unless you had it rebored. If you didn't you will see that the bores are very shiny where they have been rubbed for many years by the piston rings. You will need to remove this by honing the bores. This is simple enough, as you can buy a drill attachment. Hone the bores in a criss-cross pattern until there is no perceptible ridge and no glaze. Lubrication with WD40 or light oil is helpful (prevents the stones from overheating). Clean away the oil/grit/filings very thoroughly as anything left will damage the newly rebuilt block.
Oil the rings on the pistons thoroughly and use a ring compressor to get the pistons in the correct way. They should be put in with arrows facing a particular direction, from memory, and will probably be numbered, too. The numbers are less important, but if they're there use them.
Insert new crank shaft bearings and attach. Torque to the correct setting. If you need any of this info, just ask me or Google it, as I'm sure it'd be freely available.
If you have removed the timing case like I did, you will need to align the marks on the pulleys prior to putting the timing chain back on. This is really important: My Dad didn't get it right and it was out by 1 cog. Result was the car had no power and we had to remove the engine again to do it right!
Put the timing case back on with the sump (see below). The engine should be on TDC now.
Put the head back on and torque it up. The engine guy said that even monotorque gaskets should be re-torqued. Schedule this now. If you can't do this because it keeps moving make a note for yourself to do it as soon as the engine is back in the car. If you're a bit absent-minded, put a sticky note over the ignition to remind you.
Lift the engine up with your lifter (or block and tackle) now and put the sump/timing cover on.
The sump should be cleaned and a new gasket with lots of gasket goo will ensure you won't have any dramas with leaks. Use the torque settings again for everything. An oil leak will spoil your pleasure at the end of this and it's extremely difficult to tighten sump bolts with the engine in.
Prior to engine installation I also painted the engine. Couldn't get Chrysler engine blue so did it Ford blue. In retrospect I shouldn't have done this. The paint place in Preston (at the forking of Plenty Road) had the stuff, but I didn't know this.
Putting the engine in was the reverse of removal, with particular attention paid to the alternator and distributor. Torque the head if you couldn't before.
Make sure the distributor goes in with the rotor facing #1. If you didn't mess with the valve timing this should go back in easily and look like the photo you took beforehand. You also should not have to do with the valve clearances if you put the rods back in the same holes, unless you needed to do them anyway. If you do, start the car, warm it up, turn it off, remove the rocker cover, Turn it back on and do it while the engine's going. This is a lot easier and quicker than doing it by turning the engine over by hand.
If you want to (I didn't) you can re-check the compression to make sure it matches that in the book, and that it's consistent between cylinders. The Valiant now runs like it should. It idles much better and is better on fuel (although fuel economy still rubbish on gas for some reason).
Here are some photos of the reassembly.
If your steering's heavy, lubrication is easy with no engine

Engine Disassembly and Inspection

When it's out, I removed the head. When doing this, my Dad has always told me to keep the push rods in order, so they all go back in the same holes. Here is one way to do this:
Cardboard with holes, marked with corresponding cylinders
Simple and effective. The engine shop guy said it didn't matter how they went back in, but I like to play it safe. Disassembly of the engine is pretty easy but it was unbelievably messy. Make sure you drain the oil very thoroughly and disassemble near basins for excess oil and rags/brooms/turps for clean ups. The garage was in a very dirty state when we finished, even though I thought we were very careful. Also, you will want to clean your engine and engine bay. In retrospect I should have done this prior to starting the job.

The various bits that were removed prior to the engine.
Engine, during disassembly
The aim was to remove the pistons. When this was done, we found that several rings were actually broken. Further good news was that the piston ring grooves were worn, so new ones were needed. An old piston was cleaned up and taken to our local engine shop (C.W. Engines in Beech Street, Vermont). New pistons and rings set me back around $300, which was much better than expected, and a new bottom end gasket set was another $65 (got this from Auto surplus in Mitcham). Obviously new oil and filter are necessary for this job. New pistons and rings mean this will be a "rebuilt" engine. Reconditioning, on the other hand, involves a rebore and doing up the head. I didn't want to rebore it, since the ridges were very small. This means the ridges at the top of the cylinder bore: If they're obvious, a rebore is necessary. The thing about a full recondition is that your engine then has to be treated very carefully as it's run in. This means a set of rules which, frankly, I wouldn't be very good at adhering to. Occasional hard acceleration, but mostly very slow and gentle. If you're old enough, you will recall when people used to do this and they hung a sign on the back of their car which usually said "running in". Ah, better go around them, you would think. I avoided reconditioning mostly for this reason, but also the additional expense, delay (you have to book it in) and that initially the compression is so great that you will nearly always have trouble starting the engine after assembly.

Engine Removal


This procedure is pretty straight forward.
Take photos as you go: There is nothing more valuable than a digital camera (I mostly used my mobile's camera) when doing this, unless you have a photographic memory.
Transmission: You don't have to remove your transmission (I have an auto) but you do have to either suspend it with strong wire or rope to the car (the wiper motor is pretty strong)  or put a jack underneath it, or both, and also push the torque converter away from the engine and keep it there: If you don't do these things, the front of your trans will drop onto the floor, possibly damaging the mounts and the torque converter will separate from it, releasing about four litres of transmission fluid, also on the floor. This warning is more to avoid the mess than the expense and inconvenience.

Distributor: You will need to remove this, as it can very easily be damaged when the engine is moved. Mark the plug leads before removing the cap, as leads sometimes fall out. A pencil or ball point pen will do, unless you have black leads (if you do, use liquid paper) . I also put the engine on TDC with #1 in firing position then took a photo with the dizzy cap off. My photo of this was a bit rubbish, so I won't bother posting it.
Air conditioner: Does not have to be disconnected. Just un-mount the compressor and hang it to the side, out of the way.
Alternator: Take a shot of this before removal. If you connect anything incorrectly on your alternator, it will be disastrous.