Well, there are sporadic outbreaks of Summer now. Even though the temperatures aren't soaring in the open, the sunlight is obviously much stronger, and the cabin of the Val heats rapidly now.
It seems I haven't done due diligence on the evaporator/heater. That same model is $157 from a professional custom AC specialist. Rather than try and take it back with a lie (e.g. I changed my mind, it doesn't fit, etc.) I'll just take the near $100 hit. Own fault really, but learn my lesson, people. I've found that ebay holds very few bargains these days. The other day I couldn't find a particular computer CPU for less than $279, but it was $199 in a local shop! Sellers also complain about ebay's massive increase in charges over the past ten years. I've all but abandoned it now for other, sometimes more traditional, methods.
Speaking of which, the custom AC professionals in question (frozen air Keysborough) were recommended by a work associate. Franck spoke to me for ages about exactly what my options are regarding this. Being able to work on my own car has great cost benefits. Well, OK I knew this but it applies even more when doing AC work. Franck took the wind out of my sails a bit by telling me of all the things that can go wrong with putting second hand stuff into your car. Hope returned when he let me know how cheap the parts are! A brand new AC compressor can cost as little as $200, a condenser (the radiator bit) is only about $120 and of course the evaporator is about $157. The difficult and therefore expensive thing is mounting this cheap compressor on the slant. Brad from Valiant Spares will be doing this for me next week, at $750 - $800 estimated cost. Hoping to get the whole thing up and running perfectly for around the $1700 mark. It's ebay for the Ford parts now :-(
Oh, and one more thing, You can get all of the brackets for a DIY job. See http://www.nostalgicairparts.com/air-conditioning/170-225cc-six-cylinder-chrysler-compressor-mount-kit-306.php for details. This will save you a heap of money. Unfortunately I am a bit "time poor" now. The brackets and pulleys are extremely expensive to have made otherwise, as they'd be a one-off (and cost about $500!).
Wednesday, October 27, 2010
Thursday, October 14, 2010
Putting the EFI on hold for now
Here is the reason:
1. Mating the Ford item to the Holley slant six manifold was impossible (well, without a further $600 or so) and wouldn't have looked very good.
I have decided to go about it differently. The Ford already has an inlet manifold. Is it possible to modify this to go straight on to the slant? I believe it is, but since the inlet holes are spaced differently (ford holes are uniform, slant six holes are not) it would be no easy task. I want to cut the metal separating the Ford manifold and make an Aluminium mount that will bolt to the slant on one side and to the EFI manifold bit on the other. Either way it will almost certainly require a new fuel rail. I'm going to halt it for now, though.
2. It's getting warm in Melbourne.
The Val isn't the most inviting car in the Summer. Last Summer I painted the roof white (well, off-white) to cut down on roof heat which worked really well. Also tinted the windows, and in a large wagon that's not a trivial task. Finally, when the roof lining went on earlier this year, I had the upholsterer add some extra insulation.
After all that, I know it will still be unbearable when it gets over 30, so it's time to get the Ford's Air conditioning unit on and working.
In preparation, I bought (from ebay) a brand new after market heating and cooling unit for $255. This fits under the dash and in theory will attach to all existing heater outlets. This means you don't have a large and very obvious looking unit right there at your passenger's legs. It just replaces your original one and adds an evaporator and (hopefully) quieter fan. Haven't heard it yet, and have no idea how difficult it will be to fit.
Disadvantages include that I will be losing a face-level outlet. You can buy these but I chose the hidden option instead.
It will be a while before I can get around to fit it, but will keep you informed of course.
Monday, October 4, 2010
Some pictures of the Ford system
As mentioned, I took the camera along to the wrecker, since it's a hell of a lot easier to look at a comprehensive set of photos than it is to make notes. Really - that's a good tip: How do I know this is useful? I couldn't believe how many people see me take a photo before doing work on a car and say "Hey, that's a good idea". Until my dad, who has two digital cameras and a camera phone and works on a lot of cars, said it that I thought "maybe this isn't obvious to everyone". I'm a fundamentally lazy person, and to qualify this, here is how my mind now works:
1. Preparation is really important. Too many times I've just jumped into a project then realise that firstly I don't have any, for example, gasket cement. Or, maybe the part isn't identical to the one I took off. Whatever it is, in the past I have had to make multiple trips to the wrecker, autobarn, the hardware shop, etc. A simple 'phone call to the engine shop tells you in advance that, say, they won't get around to machining your head until Thursday, so you can plan around it and not remove it until Wednesday. Prep will save you a lot of time.
2. Take photos. A picture is more than worth a thousand words. Don't rely on your repair manual. If you have in the past you should already have uttered the words "bloody crap manual!". If you're thinking "My God, that guy's psychic" I'm not: Everyone has had the same experience. Take the time to take good photos. Pay particular attention to wiring, even if you think you know where everything goes. Take multiple angles before you start. About 90% or more of your photos will be before or during disassembly/removal. Anything you do afterwards is just for your ego anyway - unimportant. Good photos will save you time - take your camera to the wrecker.
3. Never, ever rush. If you expect a job to take an hour and you have to leave in just over an hour, don't start the job. My dad (was a mechanic for many decades) said to expect all jobs to take twice as long as you expect. I found that sometimes even that was very optimistic, but if you leave two hours for the one hour job and it actually only takes an hour (I have found this to be the very rare exception), that's a bonus.
4. Don't get angry. Think about it: Why get angry at metal, plastic etc. It's not trying to piss you off. How can it? Giving you advice to calm down is what I won't do: If you become aware that you're getting angry at the nut that just won't turn, stop trying. Take yourself away from it for a minute. Cup of tea, toilet break etc and you'll probably come up with a new plan on the way back to the garage. Getting angry will set you back and you may break something expensive.
5. Concentrate. When you are taking off the manifold, that's all your mind should be doing, and not thinking about last night or what you'll be doing later. Concentrate as completely as you can on the task you're doing now and not thinking about anything else will add quality to the job. You won't forget to tighten nuts and you won't take short cuts.
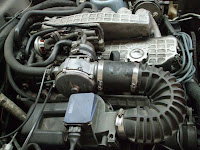
OK, here's the engine bay. It's clear that the car was on LPG here. I noticed that the gas converter (far side of the bay) was an "OHG". I did an LPG course in 1991 and OHG (over the hill gang, older Impco workers made redundant who started their own factory) were popular then. They haven't existed for some time now so I didn't take it. My car already has LPG so I'll use my own converter with the inline mixer you can see in the picture.
Here is most of it later that day, on the back porch.
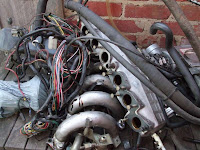
Might have mentioned this already, but my dad was rather annoyed at my wanting to get the entire EFI wiring loom. I considered it a massive time saver. As well as the useful connectors, it will only work in the same layout as the original. What I mean is that if you try to connect the knock sensor, for example, only the right connector will reach it comfortably.
The manifold is fantastically well constructed, and in multiple parts. It would be great if I could use this on the slant, but I measured the lengths this morning and the slant is significantly longer. Well, I already bought the slant EFI manifold, so I'll be heading to the engine shop this afternoon to get their advice and get some prices. Will be calling two of the usuals beforehand. More later.
1. Preparation is really important. Too many times I've just jumped into a project then realise that firstly I don't have any, for example, gasket cement. Or, maybe the part isn't identical to the one I took off. Whatever it is, in the past I have had to make multiple trips to the wrecker, autobarn, the hardware shop, etc. A simple 'phone call to the engine shop tells you in advance that, say, they won't get around to machining your head until Thursday, so you can plan around it and not remove it until Wednesday. Prep will save you a lot of time.
2. Take photos. A picture is more than worth a thousand words. Don't rely on your repair manual. If you have in the past you should already have uttered the words "bloody crap manual!". If you're thinking "My God, that guy's psychic" I'm not: Everyone has had the same experience. Take the time to take good photos. Pay particular attention to wiring, even if you think you know where everything goes. Take multiple angles before you start. About 90% or more of your photos will be before or during disassembly/removal. Anything you do afterwards is just for your ego anyway - unimportant. Good photos will save you time - take your camera to the wrecker.
3. Never, ever rush. If you expect a job to take an hour and you have to leave in just over an hour, don't start the job. My dad (was a mechanic for many decades) said to expect all jobs to take twice as long as you expect. I found that sometimes even that was very optimistic, but if you leave two hours for the one hour job and it actually only takes an hour (I have found this to be the very rare exception), that's a bonus.
4. Don't get angry. Think about it: Why get angry at metal, plastic etc. It's not trying to piss you off. How can it? Giving you advice to calm down is what I won't do: If you become aware that you're getting angry at the nut that just won't turn, stop trying. Take yourself away from it for a minute. Cup of tea, toilet break etc and you'll probably come up with a new plan on the way back to the garage. Getting angry will set you back and you may break something expensive.
5. Concentrate. When you are taking off the manifold, that's all your mind should be doing, and not thinking about last night or what you'll be doing later. Concentrate as completely as you can on the task you're doing now and not thinking about anything else will add quality to the job. You won't forget to tighten nuts and you won't take short cuts.
OK, here's the engine bay. It's clear that the car was on LPG here. I noticed that the gas converter (far side of the bay) was an "OHG". I did an LPG course in 1991 and OHG (over the hill gang, older Impco workers made redundant who started their own factory) were popular then. They haven't existed for some time now so I didn't take it. My car already has LPG so I'll use my own converter with the inline mixer you can see in the picture.

Here is most of it later that day, on the back porch.

Might have mentioned this already, but my dad was rather annoyed at my wanting to get the entire EFI wiring loom. I considered it a massive time saver. As well as the useful connectors, it will only work in the same layout as the original. What I mean is that if you try to connect the knock sensor, for example, only the right connector will reach it comfortably.
The manifold is fantastically well constructed, and in multiple parts. It would be great if I could use this on the slant, but I measured the lengths this morning and the slant is significantly longer. Well, I already bought the slant EFI manifold, so I'll be heading to the engine shop this afternoon to get their advice and get some prices. Will be calling two of the usuals beforehand. More later.
Sunday, October 3, 2010
Saturday was the day
For me the Grand Final hold very little interest. So, at 9am, Dad and I got into the Val and went to Moorabbin to scavenge EFI parts off a ZL Fairlane.
The parts on a ZL are the same as those on an XF Falcon (/Fairmont) or equivalent LTD. I chose these because from the book (1991 edition of the Gregorys Engine Management book - invaluable), it looked a lot like the most advanced EFI setup that doesn't use a crankshaft position sensor, which would have required welding. As a bonus it's from a Ford, and is therefore extremely common and well understood. The system is the first version of Ford's "EEC-IV" (I pronounce it "eck four", don't know if that's right or not).
The car was from ebay. I would have bought the whole car but for space issues. A Fairlane with EFI, rear discs, LPG, Air conditioning, power steering, cruise control and nobody bid the minimum $500 even after re-listing it! What sort of world do we live in? I'll tell you - one with this sort of bargain. I called the seller (Mark, from D & M Spares) and asked if he would now wreck it. Yes, of course, or I wouldn't be telling you this.
So we were there Sat morning and got straight to it. Mark helped a lot and even provided access to his repair manual ($3 from ebay! Needless to say, he has recognised the bargains available too). I took quite a few photos but left them at home, so will upload later.
I also bought the air conditioning system. less the under dash stuff. The reason for leaving that out was simply that it is unlikely to fit any other car. It's an integrated heater/AC and I thought a lot of effort for a lot more effort trying to fit it in the Val followed by likely disappointment when it doesn't fit. I will just buy one of those after market under dash jobs.
It took about five hours to relieve the car of it's precious cargo. I say cargo here because judging by the smell of the petrol (like paint - really) the injectors haven't been spraying out any petrol for over twenty years. Possible problems are the fuel pump, which definitely won't work: Even if it didn't have melted seals, and wasn't clogged up with petrol paint, it was built in to the fuel tank. I don't like my chances of getting it into the Val's tank then getting it working. No, an external pump is essential. Luckily Mark has a VH Commodore unit at home for me.
My dad wanted to cut all of the wires that went to the injection system, but I didn't. It was decided to remove everything under the bonnet except for wiring to the headlights. I took the distributor, all relays (and by God there were a lot of relays) and connectors. It probably added an hour to the job but meant saving probably six hours of guesswork and probably damaging components in the process. This system did not incorporate an oxygen sensor. Initially I thought this was good, but these can be an invaluable tool in setting your computer. Here's how: When the air-fuel ratio is right they will produce 0.7 volts. This is at 450C (where the six pipes merge is a good place to put it) and at 4000RPM. The actual adjustment of this ratio is done by modification of the air flow meter's output. Theory is if you want to change the mixture change the resistance provided by this meter. If you tell the computer there is less air flowing than there is, it will put less petrol to the injectors, thus giving you a leaner mixture. Doing the opposite will give a richer mix. So, using resistors, an oxygen sensor and a multi meter, you can tune your car! Actually, if you have a carby, you can still use the sensor, but obviously with a carby you'll have to open it up and swap jets.
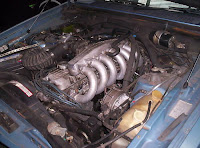
Anyway, I'll be back later with pictures of the parts. Here's the engine bay:
The parts on a ZL are the same as those on an XF Falcon (/Fairmont) or equivalent LTD. I chose these because from the book (1991 edition of the Gregorys Engine Management book - invaluable), it looked a lot like the most advanced EFI setup that doesn't use a crankshaft position sensor, which would have required welding. As a bonus it's from a Ford, and is therefore extremely common and well understood. The system is the first version of Ford's "EEC-IV" (I pronounce it "eck four", don't know if that's right or not).
The car was from ebay. I would have bought the whole car but for space issues. A Fairlane with EFI, rear discs, LPG, Air conditioning, power steering, cruise control and nobody bid the minimum $500 even after re-listing it! What sort of world do we live in? I'll tell you - one with this sort of bargain. I called the seller (Mark, from D & M Spares) and asked if he would now wreck it. Yes, of course, or I wouldn't be telling you this.
So we were there Sat morning and got straight to it. Mark helped a lot and even provided access to his repair manual ($3 from ebay! Needless to say, he has recognised the bargains available too). I took quite a few photos but left them at home, so will upload later.
I also bought the air conditioning system. less the under dash stuff. The reason for leaving that out was simply that it is unlikely to fit any other car. It's an integrated heater/AC and I thought a lot of effort for a lot more effort trying to fit it in the Val followed by likely disappointment when it doesn't fit. I will just buy one of those after market under dash jobs.
It took about five hours to relieve the car of it's precious cargo. I say cargo here because judging by the smell of the petrol (like paint - really) the injectors haven't been spraying out any petrol for over twenty years. Possible problems are the fuel pump, which definitely won't work: Even if it didn't have melted seals, and wasn't clogged up with petrol paint, it was built in to the fuel tank. I don't like my chances of getting it into the Val's tank then getting it working. No, an external pump is essential. Luckily Mark has a VH Commodore unit at home for me.
My dad wanted to cut all of the wires that went to the injection system, but I didn't. It was decided to remove everything under the bonnet except for wiring to the headlights. I took the distributor, all relays (and by God there were a lot of relays) and connectors. It probably added an hour to the job but meant saving probably six hours of guesswork and probably damaging components in the process. This system did not incorporate an oxygen sensor. Initially I thought this was good, but these can be an invaluable tool in setting your computer. Here's how: When the air-fuel ratio is right they will produce 0.7 volts. This is at 450C (where the six pipes merge is a good place to put it) and at 4000RPM. The actual adjustment of this ratio is done by modification of the air flow meter's output. Theory is if you want to change the mixture change the resistance provided by this meter. If you tell the computer there is less air flowing than there is, it will put less petrol to the injectors, thus giving you a leaner mixture. Doing the opposite will give a richer mix. So, using resistors, an oxygen sensor and a multi meter, you can tune your car! Actually, if you have a carby, you can still use the sensor, but obviously with a carby you'll have to open it up and swap jets.
Anyway, I'll be back later with pictures of the parts. Here's the engine bay:

Subscribe to:
Comments (Atom)