Tuesday, November 29, 2011

Engine Reassembly

This is pretty easy if you take care. First of all, prepare the bore unless you had it rebored. If you didn't you will see that the bores are very shiny where they have been rubbed for many years by the piston rings. You will need to remove this by honing the bores. This is simple enough, as you can buy a drill attachment. Hone the bores in a criss-cross pattern until there is no perceptible ridge and no glaze. Lubrication with WD40 or light oil is helpful (prevents the stones from overheating). Clean away the oil/grit/filings very thoroughly as anything left will damage the newly rebuilt block.
Oil the rings on the pistons thoroughly and use a ring compressor to get the pistons in the correct way. They should be put in with arrows facing a particular direction, from memory, and will probably be numbered, too. The numbers are less important, but if they're there use them.
Insert new crank shaft bearings and attach. Torque to the correct setting. If you need any of this info, just ask me or Google it, as I'm sure it'd be freely available.
If you have removed the timing case like I did, you will need to align the marks on the pulleys prior to putting the timing chain back on. This is really important: My Dad didn't get it right and it was out by 1 cog. Result was the car had no power and we had to remove the engine again to do it right!
Put the timing case back on with the sump (see below). The engine should be on TDC now.
Put the head back on and torque it up. The engine guy said that even monotorque gaskets should be re-torqued. Schedule this now. If you can't do this because it keeps moving make a note for yourself to do it as soon as the engine is back in the car. If you're a bit absent-minded, put a sticky note over the ignition to remind you.
Lift the engine up with your lifter (or block and tackle) now and put the sump/timing cover on.
The sump should be cleaned and a new gasket with lots of gasket goo will ensure you won't have any dramas with leaks. Use the torque settings again for everything. An oil leak will spoil your pleasure at the end of this and it's extremely difficult to tighten sump bolts with the engine in.
Prior to engine installation I also painted the engine. Couldn't get Chrysler engine blue so did it Ford blue. In retrospect I shouldn't have done this. The paint place in Preston (at the forking of Plenty Road) had the stuff, but I didn't know this.
Putting the engine in was the reverse of removal, with particular attention paid to the alternator and distributor. Torque the head if you couldn't before.
Make sure the distributor goes in with the rotor facing #1. If you didn't mess with the valve timing this should go back in easily and look like the photo you took beforehand. You also should not have to do with the valve clearances if you put the rods back in the same holes, unless you needed to do them anyway. If you do, start the car, warm it up, turn it off, remove the rocker cover, Turn it back on and do it while the engine's going. This is a lot easier and quicker than doing it by turning the engine over by hand.
If you want to (I didn't) you can re-check the compression to make sure it matches that in the book, and that it's consistent between cylinders. The Valiant now runs like it should. It idles much better and is better on fuel (although fuel economy still rubbish on gas for some reason).
Here are some photos of the reassembly.
If your steering's heavy, lubrication is easy with no engine

Engine Disassembly and Inspection

When it's out, I removed the head. When doing this, my Dad has always told me to keep the push rods in order, so they all go back in the same holes. Here is one way to do this:
Cardboard with holes, marked with corresponding cylinders
Simple and effective. The engine shop guy said it didn't matter how they went back in, but I like to play it safe. Disassembly of the engine is pretty easy but it was unbelievably messy. Make sure you drain the oil very thoroughly and disassemble near basins for excess oil and rags/brooms/turps for clean ups. The garage was in a very dirty state when we finished, even though I thought we were very careful. Also, you will want to clean your engine and engine bay. In retrospect I should have done this prior to starting the job.

The various bits that were removed prior to the engine.
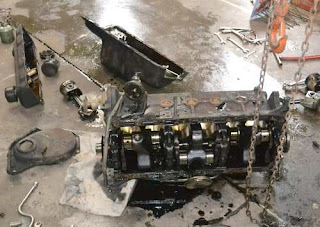
Engine, during disassembly
The aim was to remove the pistons. When this was done, we found that several rings were actually broken. Further good news was that the piston ring grooves were worn, so new ones were needed. An old piston was cleaned up and taken to our local engine shop (C.W. Engines in Beech Street, Vermont). New pistons and rings set me back around $300, which was much better than expected, and a new bottom end gasket set was another $65 (got this from Auto surplus in Mitcham). Obviously new oil and filter are necessary for this job. New pistons and rings mean this will be a "rebuilt" engine. Reconditioning, on the other hand, involves a rebore and doing up the head. I didn't want to rebore it, since the ridges were very small. This means the ridges at the top of the cylinder bore: If they're obvious, a rebore is necessary. The thing about a full recondition is that your engine then has to be treated very carefully as it's run in. This means a set of rules which, frankly, I wouldn't be very good at adhering to. Occasional hard acceleration, but mostly very slow and gentle. If you're old enough, you will recall when people used to do this and they hung a sign on the back of their car which usually said "running in". Ah, better go around them, you would think. I avoided reconditioning mostly for this reason, but also the additional expense, delay (you have to book it in) and that initially the compression is so great that you will nearly always have trouble starting the engine after assembly.

Engine Removal


This procedure is pretty straight forward.
Take photos as you go: There is nothing more valuable than a digital camera (I mostly used my mobile's camera) when doing this, unless you have a photographic memory.
Transmission: You don't have to remove your transmission (I have an auto) but you do have to either suspend it with strong wire or rope to the car (the wiper motor is pretty strong)  or put a jack underneath it, or both, and also push the torque converter away from the engine and keep it there: If you don't do these things, the front of your trans will drop onto the floor, possibly damaging the mounts and the torque converter will separate from it, releasing about four litres of transmission fluid, also on the floor. This warning is more to avoid the mess than the expense and inconvenience.

Distributor: You will need to remove this, as it can very easily be damaged when the engine is moved. Mark the plug leads before removing the cap, as leads sometimes fall out. A pencil or ball point pen will do, unless you have black leads (if you do, use liquid paper) . I also put the engine on TDC with #1 in firing position then took a photo with the dizzy cap off. My photo of this was a bit rubbish, so I won't bother posting it.
Air conditioner: Does not have to be disconnected. Just un-mount the compressor and hang it to the side, out of the way.
Alternator: Take a shot of this before removal. If you connect anything incorrectly on your alternator, it will be disastrous.

Compression Test

At least it's still November, so this is still "shortly" to me.
Performed a compression test early September to find out if there was anything weak in the engine. If you don't know what this is all about, buy a compression tester from your local auto parts shop.
Compression test
Remove all the spark plugs and screw the tester into #1 spark plug hole. If you didn't buy a screw in one, you will need to hold the tester in place and get someone to help you. Look, just get the screw in one.
With it firmly in place, put your foot on the accelerator and press it to the floor. Now, turn the engine over. You'll hear the compression strokes move the needle of the gauge (sounds like puffing). When you've gone through three engine cycles, check the gauge. Repeat for the other cylinders and write down the results.
As mine is a 160HP slant, compression is expected to be higher then the 155HP version (red motor). I was hoping for 180psi, and got the following:
1 138
2 110
3 155
4 155
5 148
6 152
Urgh! Bloody awful. Definitely something (or things) wrong here. With these results, we look for a couple of things, being firstly the number, which is obviously quite low here and secondly whether the readings are similar to each other, which they are not in my case.
If there's any low numbers at all, you can determine if it's the head or piston that's causing the problem by doing a second test. This time, grab an oil can and squirt some in befrore screwing the compression tester in. The reason that we do this is that squirting oil in will seal any misbehaving rings and bring up the reading significantly if the problem is with piston rings. If the problem is with the head (e.g. valves are damaged or valve stems worn out) the reading will still be low.
With mine, the compression came up significantly as expected, since I had the head resurfaced, bought new valves etc when the LPG buggered it up about two years ago.
So I was going to have to remove the engine. Did this on 6th September.

Monday, November 7, 2011

Lots to write about.

My employment finished up a little while ago (over two months) and I've busy with the car. Took the engine out in September and re-sprayed the whole car in November. Other little jobs include replacement of the idler arm, front indicator switch, master cylinder seal replacement and, well, more than I can accurately recall. There has been a lot going on, but the car is now very much more driveable than two months ago. It also looks pretty good now, too. I did the master cylinder yesterday. The problem now is that I have too much to write down. Luckily I got photos of all the big jobs.
OK, have to go now - since writing this I remembered that I have to seal the LH tail light and replace the bulb before it rains again.

More very shortly, I promise!

P.S. Bendigo swap meet is on this Saturday. See you there.

Sunday, May 8, 2011

six weeks later...

He said it's finally ready. Not all that impressed that it took so long, but it did and I'll be getting it Wednesday.

Obviously nothing has been done on the car since March, but I'll get to some stuff shortly - just can't recall what needs to be done without looking at it.

Tuesday, March 22, 2011

A/C is with the guy

OK, been dragging the heels with this. The guy now has the Val and assures me he will put a really neat setup under the dash (including replacing the heater).
Should get it back by the end of the week. Bought a '96 Verada as a runaround car for the Summer (it has a wonderful A/C unit), and was also built in Tonsley, SA. Well, it was the cheapest A/C equipped car I could get that was built in the same factory :-)
Going to the U.S. later this year, and hope to get a classic car. Don't really have the money for a classic I want (1970 Dodge Challenger) so may have to settle for a Pontiac ('67 firebird 400 if cheap enough, or 1960s Bonneville convertible). The latter seem quite affordable, whereas the big hemis are a fortune (up to $75,000).

P.S. http://www.nostalgicairparts.com/air-conditioning/170-225cc-six-cylinder-chrysler-compressor-mount-kit-306.php You can get ALL the parts you need, manufactured for $US266.97 plus shipping.
Even with shipping, it's bound to cost less than how I did it.